Friday, 1 July 2016

Paint with me!!

So heres how i did my Acrylic painting . It's pretty easy thing to do. Firstly there are no rules to follow. You can draw your heart out. That's the best and my favourite thing about art. It helps you loosen up and get you all focused right at the same time.

Now, to begin with I first made this sketch with the help of a pencil. #pencil because I had to cover it up with paint. In other paintings I like to use chalk which is easier to rub if it goes wrong.

Paint the base of the face with this nude color. Mixing (orange and white) in the right consistency.


Give it highlighting on the desired areas with baby pink color : cheeks, neck, collar bone, nose, shoulder and cleavage


Use white for the contouring and highlighting. It automatically gives an embossed look as you splash little white on it. Make sure to make the lips sleek and RED.
Outline the whole body with the thinnest brush so that you make fine even lines all around. Now start the hair. Make them look as natural as you can. Let them be free.


Coat the hair with white color so that the whole base becomes even.


Mix some black color with white and you'll get grey tone. Give highlights on each streak of hair. It'll take time but it'll be worth it.


Now that you've highlighted with light grey. Give it a definite and final shape with black color.
Make sure to not be too fine with the lines. Little transition is appreciated

And after you're done with the black. Give some extra sheen to them with pure white strokes.


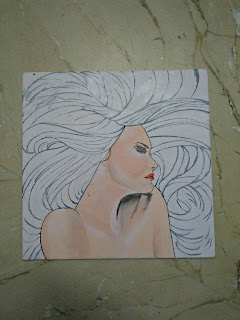
Paint the background with the color of your choice. I painted brown because it complements the skin tone.


And here we are. We almost finished this beauty.

There's a lot of mess around. But you feel elated seeing your creation, don't you?

So when are you trying it? Make sure to tag me on Instagram or give your creation #igifmama this hashtag.

Keep loving and creating.
Lots of love and painted kisses
Xoxo

Monday, 12 October 2015

Stripe it this season!

Stripessss
Omg stripes are so much in trend these days, bags, tanks, trousers, shoes, pants, jumpsuits, tops and what not!

So yeah here's how I styled my striped dress for a day out or a night out. The best part is it looks cute and sexy at the same time girls.

(And the secret behind these stripes is that it hides ALL YOUR FLABS)

I paired my black n white striped dress with Red Heels. Red heels are a must have. Pair them Up with black, white, blue, beige......grey!! It sums up all.

So yeah coming back to how I styled it. I have these tassled earrings/ feather earrings which are in hot red color and as I have black hair they totally compliment my skin tone and hair color.


Carry a tan bag with it. Let it be a tote if you have too many things to carry (which is my situation) carry a sling bag, or a bucket. Any type of bag would go with it. The important thing is the bag should be plain and preferably deep colored.


Lipstick.
Keep it simple girl. When you have too much red red going on let the lips be nude.

A MUST HAVE LIPSHADE IS "LAKME 9-5 RED CHAOS". The only red we can see is in its name. It's a daily wear lipstick when generally we want to keep it simple. Without too much bling. Which goes on with almost every outfit.


So there are girls who have really pink lips. For them I'd suggest to keep them bare. Natural color goes with almost anything.

Here's a tip:
TIP FOR PINK SOFT LIPS GIRLSSS... So before you go to bed, take some oil on your finger and dab it on your navel, each night without fail. Trust me you'll have wrinkle free, pink blush kissable lips. So soft!

Make sure you the oil doesn't overflow from the navel. Take enough oil to wet the hole.

Wear an old tee, cause oil marks are hard to remove. Follow this lil tip relrgiously And you're kiss ready!!!

So that was a bit too much for this striped dress.

AN ALTERNATIVE TO RED HEELS.

yes so many of you might not be having red heels. Dont worry!

You can always pair dresses with boots. Pair them up with tan or camrl brown boots. They'll look classy and comfortable at the same time.

I hope you girls find my lil tips useful and you follow them too. I would love to hear from you.

So much love.
Xoxo

Sunday, 4 October 2015

DIY skirt from a scarf

#part 3 goaaaaaaaaaah

So back then I bought this amazing color block scarf which can be used used in multiple ways beyond imagination. What I can think of right now is making a skirt, a clutch, the most cool bright kimono, and yeah a top of course!!

The coolest accessory it would make is............umm okay so lemme try it before telling you.

How cool and explicit this very fabric could be. I didn't imagine while buying it. Long live the human that made it. Yes I get emotional for such stuff.

Okay so what you gotta do is
~ if you're short of clothes to wear
~if bybchanve some moron spilled ketchup on your shorts/skirt that you wearing
~is  there is a party just after a long day out with girls and you cannot possible carry a different outfit
~OR
~The most common of all, if you get bored of what youve been wearing all day and want some change
~or iff i swear this is the last if, IF again you have put on weight, and you think that those shorts or skirt makes that belly bulge out, then chill babes what you've got to do is
~
~
~
~~~
~
~~
~
~
~
~
~
~
~
Follow these simple steps

Take any scarf, fold it into double the longer sides together.


 Now tuck it inside your shorts, skirts and secure it with a safety pin.


Now, wrap it around keeping enough space to move your legs


Bring it all the way forward, make sure the ends match


And, now gather the cloth from the other end making a nice gather


Tuck it inside your shorts, leaving outside the gather to give it a cute look.

And it's done???

Omg!!!

Isn't it like too easy.

So you can pair it up with a speggati top, a busteer crop top, or a loose flowy one like I did to make it comfy and easy peasy.


Girl, you're ready to rock!!!


Some posing around on those cute skirt and flip flop. They're a must for summers.
Who wants to wear a jeans all day. And I'm not afraid of tanning. I'm a fighterrrr!!!


Yea so add on some chunk jewellery which every girl has a bucket full of. And these are the outfits which seem so cool and teaming it up with some earrings or a cute neck string won't do any harm.


Get your glares on!!
Go out of that pool party like a pro, and people will keep wondering if it was the same girl!!

So this also my Let's go goaaaaaaaaaah!! #part3

Wear this outfit to the beach.
Have a scarf always.
Put on some sunscreen
and no one can stop youuuuuu!!


The best part is, it can go with almost any accessories, a tan bag, a fringe bag, a messenger bag, a cute lil customised sling....


Wrap up the scarf around your neck like an infinity scarf.


Enjoy your day at the beach, in the nature.


Make sure the colors you choose are either too bright (neon family) or oceanic to get the best pictures.


I know no one wants to carry too many bags to a trip but what do we do ??? There is make up, shoes, bags, accessories, clothes, some more clothes if they don't look nice, some last minute clothes, some extra clothes if nothing works, and then some necessary clothes!!!

Poor we!

We girls end up carrying the biggest bag ever. So pack your stuff like a pro. The day can be spent in the pink shorts, in the night you can turn the scarf into those cute shorts. How amazing is that. And both the outfits are super cute.


So this my tip, I hope it was useful for you.
Make a skirt like that in seconds and enjoy your day.
Xoxo

Thursday, 24 September 2015

Let's go goaaaaaaaaaah #part2

Hey guys so this is the same jumpsuit that I DIYed and shared with you and it turned out to be pretty cute. I can't wait to share my VERY first shoot with you.

*EXCITED MUCH*


I hope you guys like it. I need your love and support.
Keep loving yourself and stay creative.
Xoxo

DIY jumpsuit step by step

Jumsuit step by step DIY

Jumpsuits are for all body types. It hides your flabs, gives you a definite shape, adds length to your body (that depends if its long it short) .

So this DIY Tutorial shows step by step how to make your very own jumpsuit, if you know a bit of sewing.

So grab a cool printed fabric from a store. I am using a floral print with florescent flowers which is perfect for a day lunch.


 Take some chart paper and draw your templates for the shorts. The front and the back templates are same except for the crotch which is wider in back. As we need some space for out butt!!

STEP 1. 
Measure your waist (mine is 26) divide it by 4 (26/4=6.5 +1) and add one inch to it. Make 4 such pieces with the desired length. It'd be better if you trace your own shorts for better and accurate results.


STEP 2. 
Now cut the templates and pin it with the fabric are its ready to be cut. Cut accurately without leaving any extra fabric cause we already left an inch for seam allowance.


STEP 3.
This is how the 4 parts will look like. Place themand iron them.
STEP 6.
Turn them inside out and this is how they look. So neat and hassle free I feel.
Note: there's no need to do interfacing o
STEP 5.
After cutting the main fabric and the linning fabric. It's time to join them. Keeping right sides of both the fabrics together sew the boundary keeping the lower boundary open.
Repeat the same step with all the front and back pieces.
STEP 4.
Make the template for the top. Trace any top or measure your waist, arm hole, neck line, bust, and how wide strap you want. And draw the same with the measurements. Make sure you leave 1" for the seam allowance.
Keep some space for making the 3" long dart to give the perfect shape.
STEP 7.

STEP 8.
STEP 9.


This is how I styled my jumpsuit. 

#Look 1. Added a pop of color with this orange clutch which my friend gifted me and nude color heels which are my favourite because it goes with almost everything.

#Look 2. And in the second look I kept it subtle and cute with this cute pinkish beige bag from ONLY with the same Nude heels. It's perfect for a lunch date with your friends. 

That's how I rock this lil cute looking jumpsuit. And try to look hot in them!! Ha-ha


Oh my my! How much I enjoy wearing my DIYed stuff.


I'm ready for a date!!!!


So I am pretty much satisfied with my look, the jumpsuit and the shades, the lipstick, the heels and I'm totally in love with myself. 

So girls if you know a bit of sewing, why not pick up some fabric, follow these simple instructions and make yourself one.

Good luck. Girlies
Xoxo